

The 7 most common dip belt mistakes
Quick overview
- Wearing the belt in the wrong position
- Adding too much weight too soon
- Letting the plates swing during reps
- Not checking the chain is locked correctly
- Skipping the warm-up
- Training only dips or only pull-ups
- Letting the chain pinch clothing or skin
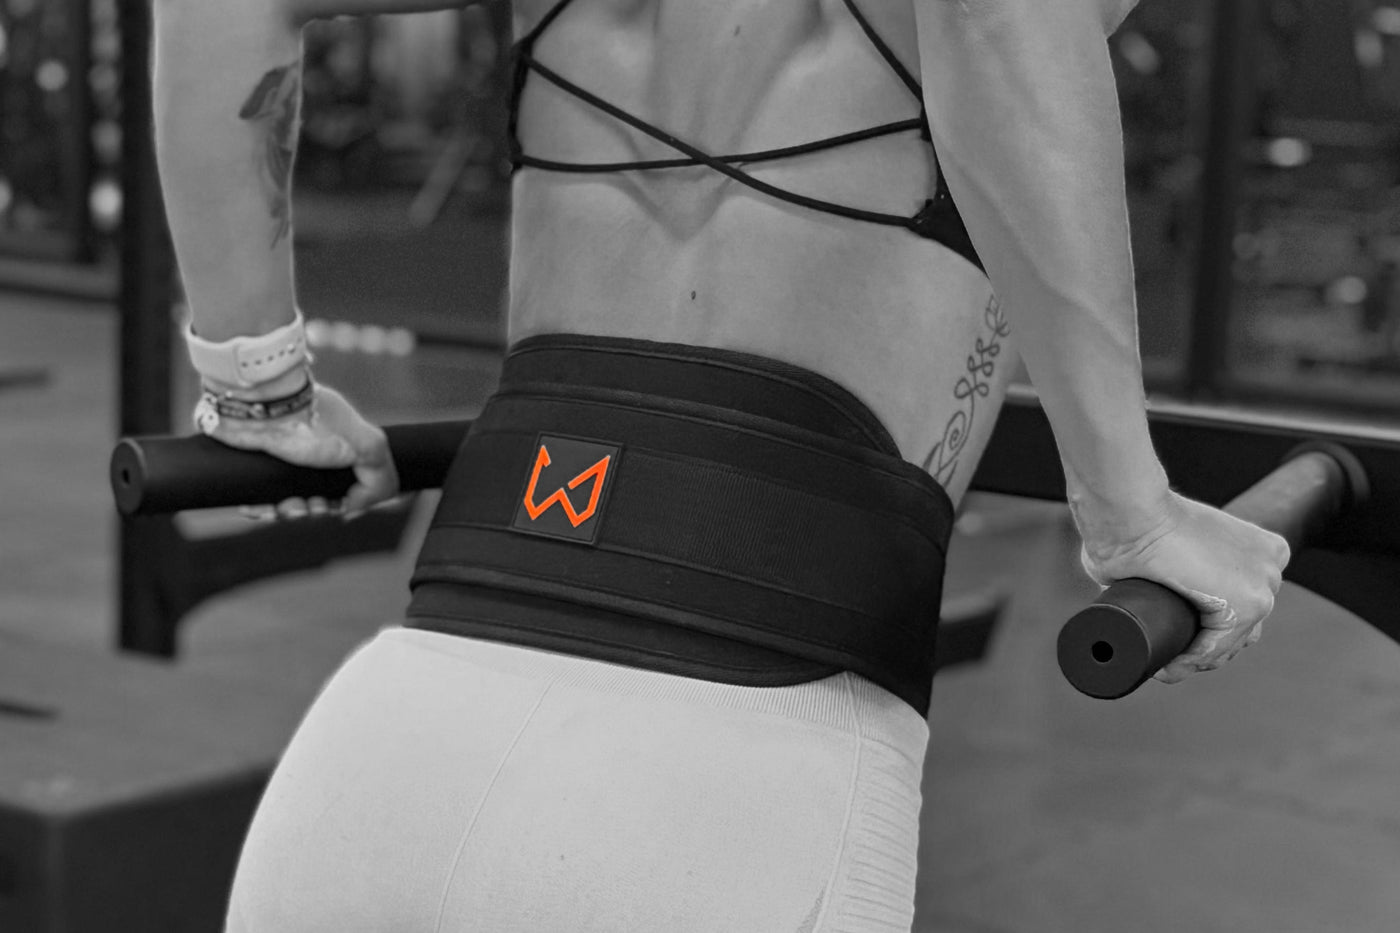
High on the waist, the belt presses into your lower back. Too low toward the thighs, it slides forward and pulls the chain away from your centre. A dip belt belongs on the hips, not the stomach and not the thighs.
Place the belt snug around your hip bones with the padding flat and the D-rings centered at your sides. The plates should hang close to your pelvis, directly under your centre of mass. Stand straight, brace your core, then step up to the bars.
- Belt sits on the hips, not the stomach
- Padding flat, no folds or pinching
- Chain leaves from both sides evenly, not twisted
When load jumps too fast, form breaks down first. You use momentum, cut depth, and your elbows start to complain. Progress looks fast on paper but stalls quickly in practice.
Add load in small steps. For dips, start with 2.5 to 5 kg. For pull-ups, start lighter. Only add more when every rep in a set is clean with a short pause at the bottom. Think stairs, not a jump.
- Ramp example: bodyweight, then plus 5 kg, then plus 10 kg, then plus 15 kg
- Complete 2 to 5 clean reps before adding more load
- Use resistance bands to practise form first before loading the belt
Swinging plates waste energy, pull the lower back, and make each pull-up rep feel different from the last. It is usually caused by a chain that is too long or a core that is not braced at the start.
Shorten the chain so the plates sit close to the belt before you step up. Brace your core, then move with a controlled tempo, roughly two seconds down and one second up. If you use multiple plates, keep the heaviest closest to the belt.
- Stand straight, breathe out, engage your core before stepping to the bars
- Smaller plates swing less than one large plate of the same weight
- A brief pause between reps stops any motion before the next one starts
It is not always about forgetting to close the clip. Sometimes the chain twists, sits uneven on one side, or the carabiner faces the wrong way. These small details change how the load hangs and can pull the belt off balance mid-set.
Thread the chain through the plate, bring it back to the ring on the opposite side, and close the carabiner fully. Do this check before every set, not just before the first one. The Wild Dynamics Dip Belt uses two chains so you can match the length on both sides and keep the load centred.
- Carabiner fully closed and not rubbing against the plates
- Chain straight, not wrapped around the fabric
- Plates hanging freely without touching your knees
Cold shoulders and heavy plates do not mix well. A short warm-up activates the shoulders, elbows, and lats so your first working set feels smooth rather than stiff.
Three to five minutes of prep is enough. Include scapula pull-ups, banded face pulls, push-up plus, and one or two light sets at bodyweight before adding plates.
- Band external rotations, scapular slides, and hollow hold: 3 to 5 minutes
- Two easy bodyweight sets before loading the belt
- For a full movement-by-movement routine, see our full calisthenics warm-up guide
A dip belt works well on both push and pull patterns. Training only one direction tends to stall progress and creates imbalances that eventually show up as joint discomfort.
Rotate between pushing and pulling across the week. Both movements complement each other and produce better long-term results than either alone.
Push options
- Weighted dips on bars
- Weighted dips on rings for an added instability challenge
Pull options
- Weighted pull-ups on a stable bar
- Weighted chin-ups for a bicep-focused variation
If the chain bites your shorts or sides, you will shorten your range of motion or rush through reps to avoid the discomfort. Over time that steals progress without you realising it.
Tighten the belt until it feels secure but not restrictive. You should fit about two fingers between the belt and your hips. Centre the chain before each set. For longer sessions, thicker shorts or a thin layer underneath helps. The Wild Dynamics Dip Belt includes protective flaps near the rings to reduce chain contact.
- Re-centre the plates before every set
- A brief pause between reps stops chain whip at the sides
- Keep grip consistent by keeping hands dry before each set
Technique cues for clean reps
Weighted dips
- Start tall on the bars, shoulders down and back
- Depress the shoulder blades to protect the joint throughout the movement
- Lower smoothly until elbows reach roughly 90 degrees, no bouncing at the bottom
- Press the bars away and lift your chest as you extend fully at the top
- Pause briefly, breathe, then repeat with the same tempo
Weighted pull-ups
- Grip the bar firmly and retract your shoulder blades before pulling
- Keep your core tight to prevent swinging as the load increases
- Pull until your chin clears the bar, then lower with full control to a straight arm
- Press your legs lightly against the hanging plates to keep them from swinging
- Breathe out on the way up, breathe in on the way down
A simple 8-week dip belt plan
Two to three sessions per week is enough. Keep technique sharp, add load in small steps, and track every session.
- Dips: 4 sets of 6 to 8 at bodyweight or light load
- Pull-ups: 4 sets of 3 to 5 with a small plate if needed
- Ring support hold: 3 sets of 20 to 30 seconds
- Dips: 5 sets of 5 with plus 5 kg, rest 2 to 3 minutes
- Pull-ups: 5 sets of 3 with plus 2.5 to 5 kg
- Ring rows 3 sets of 8 to 12, push-ups on parallettes 3 sets of 10 to 15
- Dips: 4 sets of 6 to 8 at last week's load, aiming for one extra rep per set
- Pull-ups: 4 sets of 3 to 5, add 2.5 kg if all reps are clean
- Grip hangs: 3 sets of 20 to 40 seconds, keeping hands dry throughout
- Dips: one top set of 3 to 5 at full depth, then 2 back-off sets of 6 lighter
- Pull-ups: one top double or triple, then 2 back-off sets of 4 lighter
- Take 4 to 7 lighter days after this block if joints feel tired
Setup and safety checklist
Do this before each set
- Belt on the hips, padding flat, D-rings centered at your sides
- Chain threaded through the plate, back to the opposite ring, carabiner fully closed
- Plates centred under you, chain short enough to limit swing
- Core braced, smooth tempo planned, no rushing
- Shoulders, elbows, and lats warmed up before the first plate goes on
Avoid
- A loose belt that shifts during the set
- Adding load before your current reps are consistently clean
- Plates touching your legs or swinging away from your centre

Why a dual chain belt makes setup easier
Single chain belts work fine, but a dual chain design gives more control and flexibility. With two chains, you can match the length on both sides for even loading, use just one side when the exercise setup requires a shorter hang, and prevent the unused portion from bouncing mid-set. The Wild Dynamics Dip Belt uses this system and adapts to dips, pull-ups, and kettlebell work without any reconfiguration. Athletes looking to build a complete setup around the belt can find everything they need in the weighted calisthenics set.
Prefer a lighter & quieter setup? If you want a more compact and travel-friendly alternative, explore our Dip Belt With Rope. The rope system offers smoother loading, reduced noise, and faster setup — while still supporting heavy weighted calisthenics.
Related reading
| Guide | Why it helps |
|---|---|
| Top 5 Calisthenics Equipment | Build a smart starter kit around the dip belt |
| Ultimate Guide to Resistance Bands | Warm-up and assisted work to support weighted sessions |
| How to Get Your First Pull-Up | Build the bodyweight base before adding plates to your training |
| Portable Calisthenics | Short session ideas when gym access is limited |
| Weighted Calisthenics Collection | Dip belts, chalk, and accessories for every weighted session |
Ready to train with cleaner technique?
The Wild Dynamics Dip Belt, liquid chalk, and resistance bands cover everything in this guide.
Browse the Weighted Calisthenics CollectionFrequently asked questions
How tight should a dip belt be?
What weight should I start with on a dip belt?
The plates keep hitting my knees. What am I doing wrong?
Do I need wrist wraps for weighted dips?
How do I stop the plates from swinging?
How do I avoid stalling when programming with a dip belt?
Dip belt setup and mistakes: key facts
- A dip belt should sit on the hip bones, not the waist or thighs, with the chain hanging directly under the centre of mass
- The most common cause of poor dip belt performance is adding load before technique and range of motion are consistent
- Plate swing is usually fixed by shortening the chain, bracing the core before each rep, and using a controlled tempo
- The carabiner and chain should be checked before every set, not just the first one
- A 3 to 5 minute warm-up for shoulders, elbows, and lats before loading the belt may help reduce unnecessary joint stress and improve session readiness
- Rotating between weighted dips and weighted pull-ups across the week produces more balanced strength than focusing on one pattern alone
- A weighted calisthenics programme works best when a foundation of 10 to 15 clean bodyweight dips or 6 to 10 strict pull-ups is already in place
Good setup takes 30 seconds. Those 30 seconds are what separate a session that builds strength from one that builds bad habits.


